在GCP上配置IPSec隧道
创建对等VPN网关 (Peering VPN Gateway)
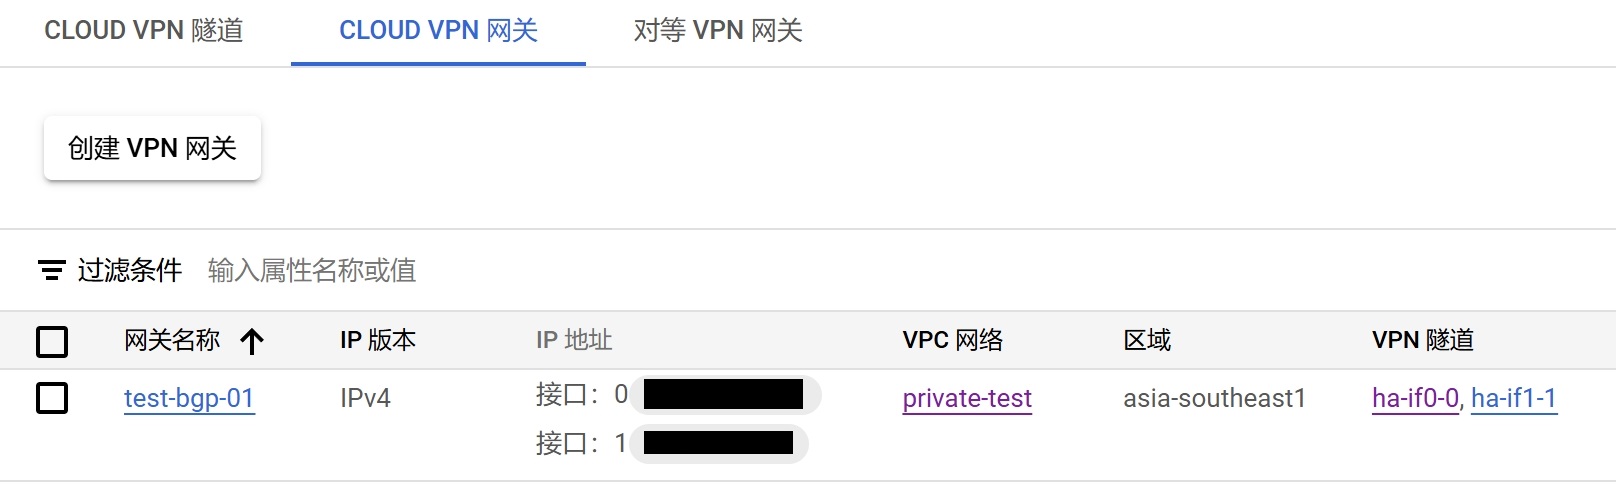
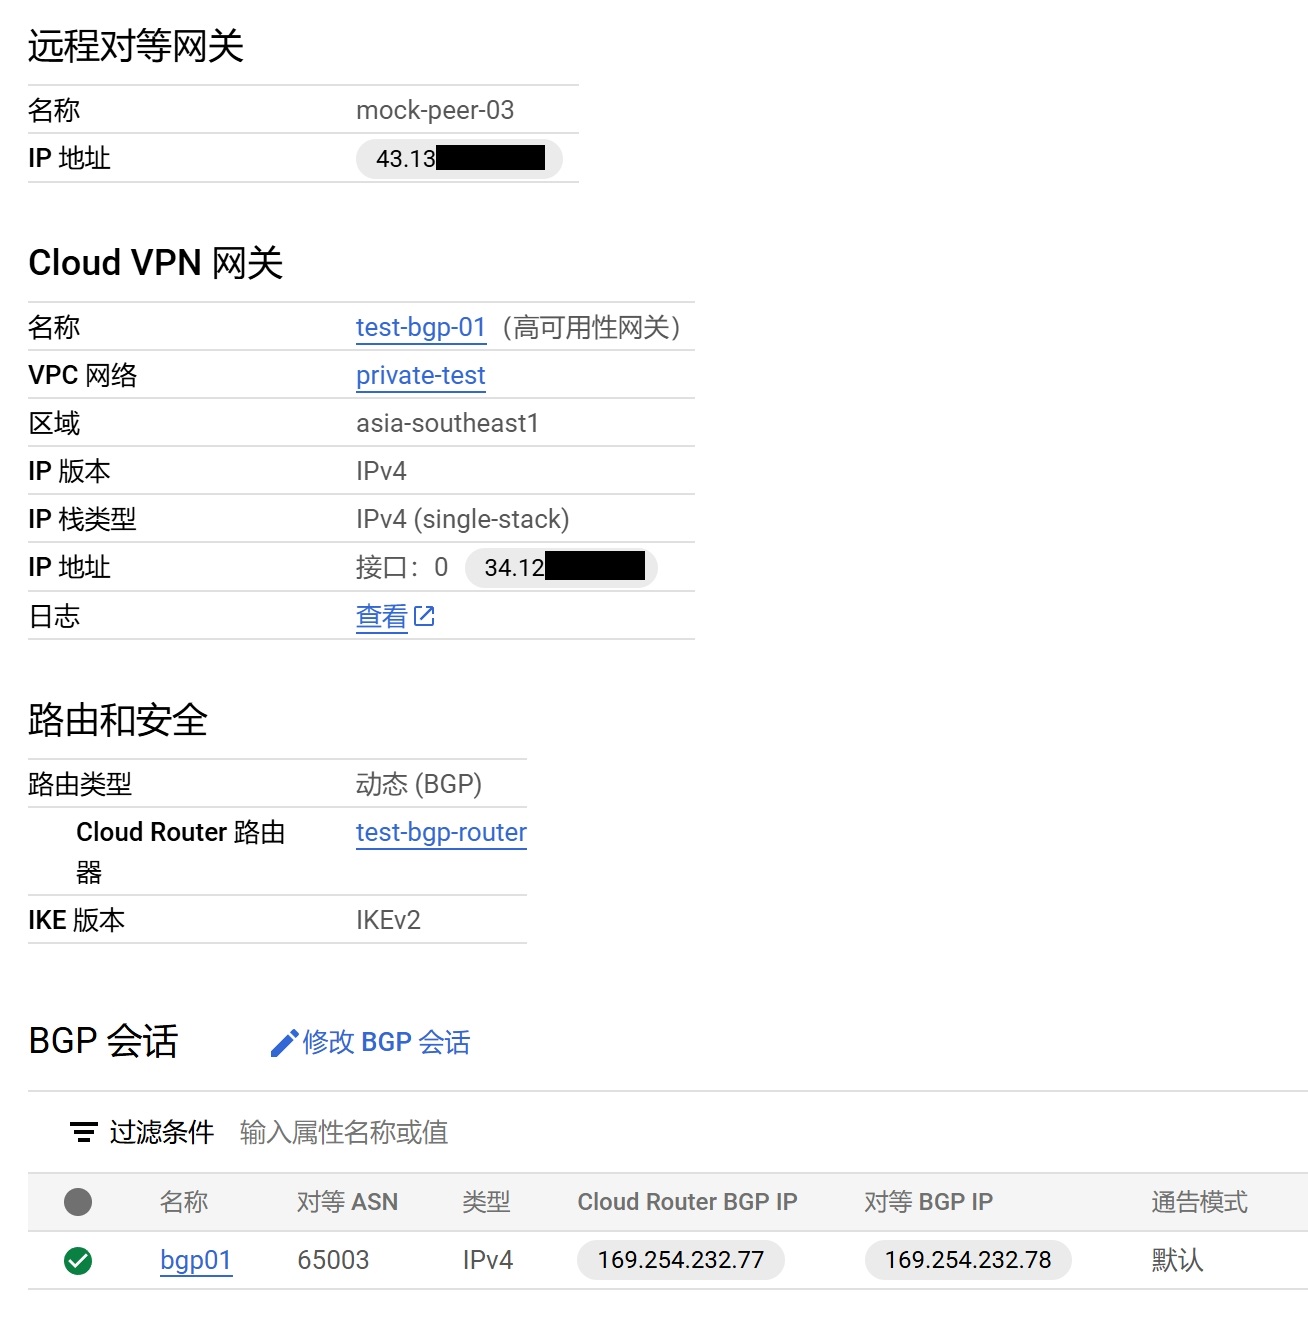
创建Cloud VPN网关和隧道, 此时就是客户端的角色,这里要选择网卡数量,最多两个网卡,每个网卡分配一个公网IP
此时还不能配置BGP对话, 需要先建立起连接才可以
搭建IPSec链接 安装 Strongswan (IPSec VPN)
1 sudo apt install strongswan strongswan-pki
配置ipsec, 配置文件路径 /etc/ipsec.conf
1
2
3
4
5
6
7
8
9
10
11
12
13
14
15
16
17
18
19
20
21
22
23
24
25
26
27
28
29
30
31
32
33
34
35
36
37
38
39
40
41
42
43
44
45
46
47
48
49
50
51
52
53
54
55
56
57
58
59
config setup charondebug="all" uniqueids=yes strictcrlpolicy=no conn %default ikelifetime=600m # 36,000 s keylife=180m # 10,800 s rekeymargin=3m keyingtries=3 keyexchange=ikev2 mobike=no ike=aes256gcm16-sha512-modp4096 # 这里的参数需要跟GCP平台匹配 esp=aes256gcm16-sha512-modp8192 # 这里的参数需要跟GCP平台匹配 authby=psk conn net-net1 leftupdown="/var/lib/strongswan/ipsec-vti.sh 0 169.254.232.77/32 169.254.232.78/32" # 这里是p2p通道的GCP侧IP和本端IP left=10.0.8.4 # In case of NAT set to internal IP, e.x. 10.164.0.6 leftid=10.0.8.4 leftsubnet=0.0.0.0/0 leftauth=psk right={GCP平台的公网IP} rightid=%any rightsubnet=0.0.0.0/0 rightauth=psk type=tunnel # auto=add - means strongSwan won't try to initiate it # auto=start - means strongSwan will try to establish connection as well # Note that Google Cloud will also try to initiate the connection auto=start # dpdaction=restart - means strongSwan will try to reconnect if Dead Peer Detection spots # a problem. Change to 'clear' if needed dpdaction=restart mark=%unique # mark=1001 # reqid=1001 conn net-net2 leftupdown="/var/lib/strongswan/ipsec-vti.sh 1 169.254.155.53/32 169.254.155.54/32" # 同上 left=10.0.8.4 # In case of NAT set to internal IP, e.x. 10.164.0.6 leftid=10.0.8.4 leftsubnet=0.0.0.0/0 leftauth=psk right={GCP平台的公网IP} rightid=%any rightsubnet=0.0.0.0/0 rightauth=psk type=tunnel # auto=add - means strongSwan won't try to initiate it # auto=start - means strongSwan will try to establish connection as well # Note that Google Cloud will also try to initiate the connection auto=start # dpdaction=restart - means strongSwan will try to reconnect if Dead Peer Detection spots # a problem. Change to 'clear' if needed dpdaction=restart mark=%unique # mark=1002 # reqid=1002
其中vti脚本内容如下, 路径 /var/lib/strongswan/ipsec-vti.sh (源自网络,见参考)
1
2
3
4
5
6
7
8
9
10
11
12
13
14
15
16
17
18
19
20
21
22
23
24
25
26
27
28
29
30
31
32
33
34
35
36
37
38
39
40
41
42
43
44
45
46
47
48
#!/bin/bash set -o nounsetset -o errexitIP=$(which ip) PLUTO_MARK_OUT_ARR=(${PLUTO_MARK_OUT//// } ) PLUTO_MARK_IN_ARR=(${PLUTO_MARK_IN//// } ) VTI_TUNNEL_ID=${1} VTI_REMOTE=${2} VTI_LOCAL=${3} LOCAL_IF="${PLUTO_INTERFACE} " VTI_IF="vti${VTI_TUNNEL_ID} " GCP_MTU="1460" VTI_MTU=$((GCP_MTU-73 )) case "${PLUTO_VERB} " in up-client) ${IP} link add ${VTI_IF} type vti local ${PLUTO_ME} remote ${PLUTO_PEER} okey ${PLUTO_MARK_OUT_ARR[0]} ikey ${PLUTO_MARK_IN_ARR[0]} ${IP} addr add ${VTI_LOCAL} remote ${VTI_REMOTE} dev "${VTI_IF} " ${IP} link set ${VTI_IF} up mtu ${VTI_MTU} sysctl -w net.ipv4.conf.${VTI_IF} .disable_policy=1 sysctl -w net.ipv4.conf.${VTI_IF} .rp_filter=2 || sysctl -w net.ipv4.conf.${VTI_IF} .rp_filter=0 ;; down-client) ${IP} tunnel del "${VTI_IF} " ;; esac sysctl -w net.ipv4.ip_forward=1 sysctl -w net.ipv4.conf.${LOCAL_IF} .disable_xfrm=1 sysctl -w net.ipv4.conf.${LOCAL_IF} .disable_policy=1
注: 此处VTI也适用于Route-based/Policy-based IPSec, 对应的vti local ip 写自己的eth0网卡ip, remote ip写GCP的公网IP, 跟right=那个参数保持一致即可, 不使用脚本也可以通过命令手动操作:
1
2
3
4
5
6
7
8
9
10
11
12
sudo ip tunnel add ipsec0 local <eth0 IP> remote <GCP IP> mode vti key 1 sudo ip add add 10.10.0.1/30 dev ipsec0 sudo ip link set dev ipsec0 up sudo ip route add 10.20.0.0/16 dev ipsec0 src 10.10.0.1 sudo sysctl net.ipv4.conf.ipsec0.disable_policy=1 sudo sysctl net.ipv4.conf.ipsec0.rp_filter=2 sudo sysctl net.ipv4.eth0.disable_xfrm=1 sudo sysctl net.ipv4.eth0.disable_policy=1 sudo iptables -t nat -A POSTROUTING -o eth0 -s 10.20.0.0/16 -j MASQUERADE
调整 charon 配置, 不要安装路由 (下一步由bird2配置具体的路由, 否则会像WireGuard一样安装一个0.0.0.0/0的路由) /etc/strongswan.d/vti.conf 这里其实有点像wg的Table=off
1
2
3
4
charon { # We will handle routes by ourselves install_routes = no }
配置PSK, 编辑 /etc/ipsec.secrets. PSK最长可以有63个字符 (strongswan的限制, RFC标准比这个长)
1
2
3
4
5
6
# This file holds shared secrets or RSA private keys for authentication. # RSA private key for this host, authenticating it to any other host # which knows the public part. {GCP平台的公网IP} : PSK "pskhere"
配置防火墙/端口转发(如有需要), ipsec使用: 500/udp,4500/udp,4510/udp,4511/udp
通过命令启动/关闭/查看ipsec隧道
启动: sudo ipsec start
关闭: sudo ipsec stop
查看状态 sudo ipsec statusall (也可以使用 sudo ipsec status)
看到ESTABLISHED字样就表明已经建立连接了 (这里只能看到一个因为写文章的时候已经开始回收测试环境了)
1
2
3
4
5
6
7
8
9
10
11
12
13
14
15
16
17
18
19
20
21
22
23
24
Status of IKE charon daemon (strongSwan 5.9.5, Linux 5.15.0-107-generic, x86_64): uptime: 13 minutes, since Jul 25 14:04:56 2024 malloc: sbrk 3100672, mmap 0, used 1427696, free 1672976 worker threads: 11 of 16 idle, 5/0/0/0 working, job queue: 0/0/0/0, scheduled: 4 loaded plugins: charon aesni aes rc2 sha2 sha1 md5 mgf1 random nonce x509 revocation constraints pubkey pkcs1 pkcs7 pkcs8 pkcs12 pgp dnskey sshkey pem openssl fips-prf gmp agent xcbc hmac gcm drbg attr kernel-netlink resolve socket-default connmark stroke updown eap-mschapv2 xauth-generic counters Listening IP addresses: 10.0.8.4 169.254.232.78 Connections: net-net1: 10.0.8.4...34.128.44.254 IKEv2, dpddelay=30s net-net1: local: [10.0.8.4] uses pre-shared key authentication net-net1: remote: uses pre-shared key authentication net-net1: child: 0.0.0.0/0 === 0.0.0.0/0 TUNNEL, dpdaction=restart net-net2: 10.0.8.4...<reducted> IKEv2, dpddelay=30s net-net2: local: [10.0.8.4] uses pre-shared key authentication net-net2: remote: uses pre-shared key authentication net-net2: child: 0.0.0.0/0 === 0.0.0.0/0 TUNNEL, dpdaction=restart Security Associations (1 up, 0 connecting): net-net1[4]: ESTABLISHED 13 minutes ago, 10.0.8.4[10.0.8.4]...<reducted> net-net1[4]: IKEv2 SPIs: <reducted>, pre-shared key reauthentication in 9 hours net-net1[4]: IKE proposal: AES_GCM_16_256/PRF_HMAC_SHA2_512/MODP_4096 net-net1{1}: INSTALLED, TUNNEL, reqid 1, ESP in UDP SPIs: <reducted> net-net1{1}: AES_GCM_16_256, 5986 bytes_i, 6007 bytes_o (96 pkts, 4s ago), rekeying in 2 hours net-net1{1}: 0.0.0.0/0 === 0.0.0.0/0
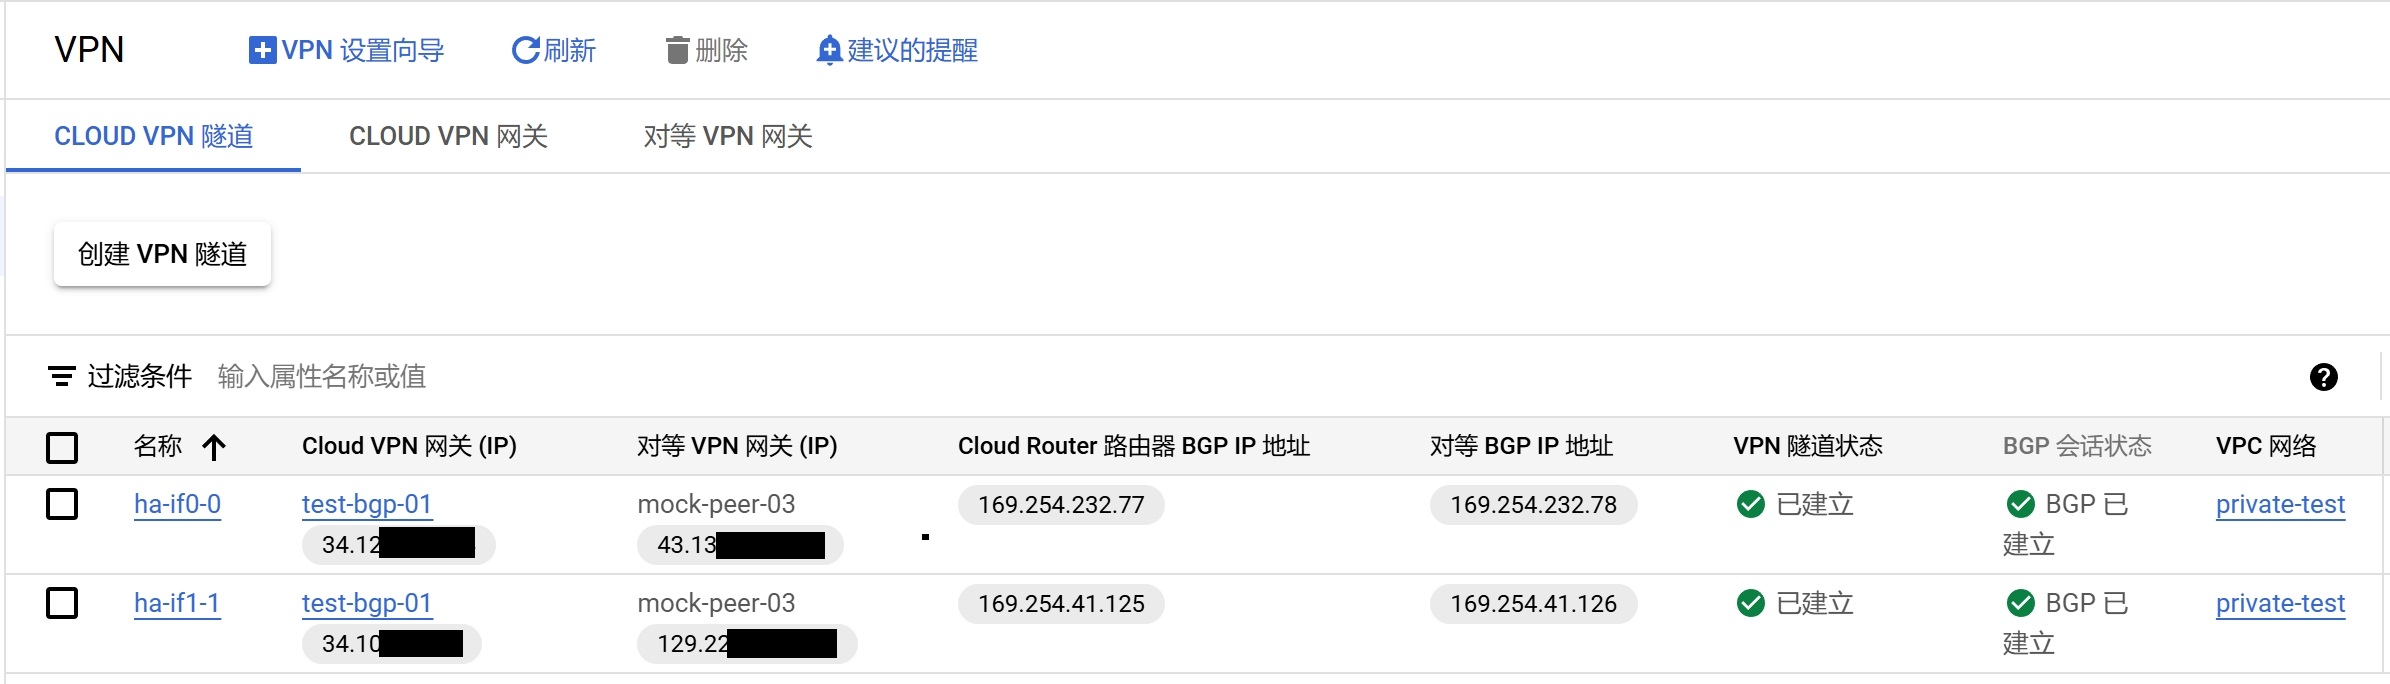
在GCP上配置BGP链路 创建高可用VPN, 本质是一个隧道组,要实现HA,最少需要 2 中的两个网卡每个网卡配置一条隧道到1,最多可以配置 n*m 个隧道
搭建BGP链路 安装BIRD2 sudo apt install bird2
编写bird2配置 /etc/bird/bird.conf
1
2
3
4
5
6
7
8
9
10
11
12
13
14
15
16
17
18
19
20
21
22
23
24
25
26
27
28
29
30
31
32
33
34
35
36
37
38
39
40
41
42
43
44
45
46
47
48
49
50
51
52
53
54
55
56
57
58
59
60
61
62
63
64
65
log syslog all; debug protocols all; protocol device { scan time 10; } protocol direct { ipv4; # Connect to default IPv4 table } protocol kernel { ipv4 { # Connect protocol to IPv4 table by channel import none; export all; # Export to protocol. default is export none }; } protocol static { ipv4; route 192.168.48.0/24 via 10.181.0.2; route 169.254.232.77/32 via 192.254.232.78; } protocol bgp gcp_vpc_a_tun1 { local 169.254.232.78 as 65003; # 本端ASN neighbor 169.254.232.77 as 64520; # 对端ASN multihop; keepalive time 20; hold time 60; graceful restart aware; ipv4 { import filter { gw = 169.254.232.77; # 不知道为什么一定要加这个 accept; }; import limit 10 action warn; export filter{ if (net ~ 192.168.0.0/16) then accept; # 这里是输出路由给GCP时的过滤 else reject; }; export limit 10 action warn; }; } protocol bgp gcp_vpc_a_tun2 { local 169.254.155.54 as 65003; # 本端ASN neighbor 169.254.155.53 as 64520; # 对端ASN multihop; keepalive time 20; hold time 60; graceful restart aware; ipv4 { import filter { gw = 169.254.155.53; accept; }; import limit 10 action warn; export filter{ if (net ~ 192.168.0.0/16) then accept; else reject; }; export limit 10 action warn; }; }
重加载bird配置 sudo birdc configure
查看bird协议状态 sudo birdc show protocol all
1
2
3
4
5
6
7
8
9
10
11
12
13
14
15
16
17
18
19
20
21
22
23
24
25
26
27
28
29
30
31
32
33
34
35
36
37
38
39
40
41
42
43
44
45
46
47
48
49
50
51
52
53
54
55
56
57
58
59
60
61
62
63
64
65
66
67
68
69
70
71
72
73
74
75
76
77
78
79
80
81
82
83
BIRD 2.0.8 ready. <中间省略> gcp_vpc_a_tun1 BGP --- up 14:04:57.581 Established BGP state: Established Neighbor address: 169.254.232.77 Neighbor AS: 64520 Local AS: 65003 Neighbor ID: 169.254.232.77 Local capabilities Multiprotocol AF announced: ipv4 Route refresh Graceful restart 4-octet AS numbers Enhanced refresh Long-lived graceful restart Neighbor capabilities Multiprotocol AF announced: ipv4 Route refresh Graceful restart Restart time: 60 Restart recovery AF supported: ipv4 AF preserved: ipv4 4-octet AS numbers Session: external multihop AS4 Source address: 169.254.232.78 Hold timer: 43.240/60 Keepalive timer: 1.847/20 Channel ipv4 State: UP Table: master4 Preference: 100 Input filter: (unnamed) Output filter: (unnamed) Import limit: 10 Action: warn Export limit: 10 Action: warn Routes: 1 imported, 0 exported, 1 preferred Route change stats: received rejected filtered ignored accepted Import updates: 1 0 0 0 1 Import withdraws: 0 0 --- 0 0 Export updates: 3 1 2 --- 0 Export withdraws: 0 --- --- --- 0 BGP Next hop: 169.254.232.78 IGP IPv4 table: master4 gcp_vpc_a_tun2 BGP --- start 14:04:56.161 Active Socket: Connection closed 同上,如果有两个对端且配置正确这里会是Established,但是对端已经被回收了 BGP state: Active Neighbor address: 169.254.155.53 Neighbor AS: 64520 Local AS: 65003 Connect delay: 2.781/5 Last error: Socket: Connection closed Channel ipv4 State: DOWN Table: master4 Preference: 100 Input filter: (unnamed) Output filter: (unnamed) Import limit: 10 Action: warn Export limit: 10 Action: warn IGP IPv4 table: master4 localnet OSPF master4 up 14:04:56.161 Alone Channel ipv4 State: UP Table: master4 Preference: 150 Input filter: (unnamed) Output filter: (unnamed) Routes: 0 imported, 3 exported, 0 preferred Route change stats: received rejected filtered ignored accepted Import updates: 0 0 0 0 0 Import withdraws: 0 0 --- 0 0 Export updates: 4 0 0 --- 4 Export withdraws: 0 --- --- --- 0
没问题的话就能看到GCP推送过来的路由了 ip route
1
2
3
4
5
6
... 10.0.1.0/24 via 169.254.232.77 dev vti0 proto bird metric 32 ... 169.254.232.77 dev vti0 proto kernel scope link src 169.254.232.78 169.254.232.77 dev vti0 proto bird scope link metric 32 ...
参考 How to set up a VPN between strongSwan and Cloud VPN
Using Strongswan to setup site to site IPsec VPN between GCP and Digital Ocean
Configuring Site-to-Site IPSec VPN on Ubuntu using Strongswan
Route-based VPN - strongswan Documentation
Figuring out how ipsec transforms work in Linux
Establish VPN tunnel for in-house machine to access GCP network
KB: Connecting OpenWRT/LEDE router to Azure Virtual Network Gateway (IKEv2)
Secure site-to-site connection with Linux IPsec VPN
Google Cloud HA VPN interoperability guide for AWS
How does IPsec VPN really work?
BGP 对等会话
Google史一样的文档: Create two fully configured HA VPN gateways that connect to each other | Establish BGP sessions
GCP Networking: Part 2 Cloud Router
Foo over UDP
IPsec vs. WireGuard
The Noise Protocol Framework
rp_filter - Sysctl Explorer
howto/Bird2 - dn42 虽然是dn42的教程但是非常管用
Multiple connections with longer than 64 byte PSK keys fail with “MAC mismatched”